If you’ve ever pulled two back-to-back shots that tasted like two different coffees, temperature stability is likely the reason. PID temperature control is the quiet hero behind consistent espresso—reducing overshoot, stabilizing brew water, and letting you target flavors with precision. In this guide, you’ll learn what PID actually does, how it compares to thermostats and “temperature surfing,” what temperatures to use for different roasts, and how to get café-level consistency at home—without adding complexity to your workflow.
Quick Takeaways
- PID (Proportional–Integral–Derivative) is a control algorithm that keeps your espresso machine near a set temperature with minimal swing, improving repeatability and flavor clarity.
- It largely removes the need for temperature surfing workflows common on thermostat-controlled single boilers.
- Target brew temperatures typically live in the 195–205°F (90–96°C) range; exact “best” temp depends on the coffee and roast level.
- PID isn’t just for pros: it simplifies day-to-day pulling by making stability the default, so small prep changes show up as taste changes—not temperature noise.
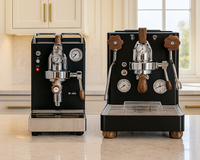
Our Favorite PID Espresso Machines
- Lelit Mara X V2 (heat exchanger)
- Lelit Bianca V3 (dual boiler)
- Rocket Espresso Appartamento TCA (heat exchanger)
Under $1,000
Why Temperature Stability Is the First Lever of Better Espresso
Extraction chemistry is hypersensitive to heat. A 1–2°F change can alter solubility and flow behaviors enough to tilt a shot from under- to over-extracted. Industry guidance and sensory work consistently place “good” brew ranges around 195–205°F (90–96°C), with many baristas favoring the ~200–203°F (93–95°C) band—especially for medium roasts. The scientific literature notes there’s less empirical certainty about a single “magic” number than you might expect, but the consensus is clear: stable, repeatable temperature matters more than chasing a mythical exact degree.
PID vs. Thermostat: What Actually Changes?
Most non-PID machines use a simple thermostat or pressurestat to switch the heating element on and off. That introduces a cycle: overshoot (too hot), decay (too cool), and re-heat. During that swing, your shot’s initial water can be hotter than later water—for the same “set temp.” PID controllers predict and correct that swing, tightening the band so your brew water at the puck is closer to your target throughout the shot. The result? Less brightness/sourness from cool water and less bitterness from overheated water within the same extraction.

What PID Does in Real Terms
- Proportional reacts to present error (how far from setpoint).
- Integral corrects accumulated past error (drift).
- Derivative anticipates future error (rate of change) to reduce overshoot.
Espresso translation: the boiler doesn’t wildly overshoot or sag; it glides to—and holds—your target as water flows.
PID vs. Temperature Surfing
Before PIDs became common, home baristas learned temperature surfing: timing a shot at a particular moment in the thermostat’s heat cycle to “catch” the right temperature. It works, but it adds time and uncertainty—especially as idle time, ambient temperature, and steam use shift the cycle. Even proponents admit surfing is not exact and adds steps to your routine. PID machines make stability the default; surfing becomes unnecessary for most users.
Shop all our PID equipped espresso machines >

Single Boiler vs. Heat Exchanger vs. Dual Boiler: How PID Helps Each
Single boiler machines benefit the most because brew temp and steam temp compete for the same boiler. PID logic reduces swings and shortens the recovery from steaming to brewing. Heat exchanger (HX) machines historically relied on flush routines to manage superheated groups; a PID-governed HX still benefits from thoughtful flushing, but stability and predictability improve. Dual boiler machines separate brew and steam, and a PID helps each boiler maintain its own setpoint independently, giving you the “set it and forget it” experience with powerful steam on tap. Community testing and expert workflows echo these patterns across machine types.

Recommended Starting Temperatures by Roast
- Dark roast: 195–198°F (90–92°C) to limit harshness and carbon bitterness.
- Medium roast: 199–203°F (93–95°C) for balance and sweetness.
- Light roast: 203–205°F (95–96°C) to boost solubility and reveal fruit/acid complexity.
These align with accepted brew ranges; treat them as anchors and adjust by taste and flow.

How to Use Your PID Day-to-Day (Simple Workflow)
- Set a baseline (e.g., 201°F/94°C for a medium roast).
- Stabilize: give the group and portafilter time to heat soak (20–30 min on prosumer machines; fewer on fast-heating thermocoils).
- Purge briefly to ensure fresh, stable water is at the group.
- Pull your shot using your normal recipe (e.g., 18 g in, ~36–40 g out in ~25–35 s).
-
Taste and nudge temperature in 1–2°F steps:
- If sour/underdeveloped and flow seems fine: bump temp +1–2°F.
- If bitter/ashy and flow seems fine: drop temp −1–2°F.
- If channeling or gushing dominates, fix puck prep first; don’t blame temperature for a distribution problem.
With a PID, you’ll notice temperature tweaks create predictable flavor changes. That’s the point.

Common Myths About PID—Debunked
“PID is only for experts.”
Actually, it reduces variables—making learning faster and shots more repeatable, even for beginners.
“A PID guarantees perfect shots.”
It guarantees more stable temperature, not perfect puck prep. You still need good distribution, a capable grinder, and fresh coffee.
“Temperature surfing is just as good.”
Skilled surfers can land near a target, but it adds steps and breaks down with idle time changes or steaming. PID gives consistency without choreography.
When Should You Change Brew Temperature?
- New coffee: start in the appropriate roast range above, then adjust for sweetness/clarity.
- Age of roast: as beans age, they often prefer slightly higher temps to maintain solubility.
- Altitude and boiling point: at higher elevations (lower boiling point), target temps at the upper end of the range can help. :contentReference[oaicite:13]{index=13}
- Recipe changes: big grind or ratio shifts can justify a 1–2°F tweak to keep flavor balance.
Practical Tuning Tips (That Don’t Require a PhD)
- Use a narrow adjustment window: ±1–2°F at a time; taste two shots at each setting to confirm the direction.
- Document coffee → temp → time → yield → taste notes; ride the pattern for repeat buys.
- Don’t chase steam power with brew temp: dual boilers let you split setpoints; on single boilers, let the machine fully recover before the next shot.
- If your machine offers “offset” settings, leave factory defaults unless you have a reliable group thermocouple and reason to recalibrate.
What If Your Machine Doesn’t Have a PID?
Temperature surfing paired with a consistent routine can still produce excellent espresso, but plan for extra time and more variability. On popular machines like the Gaggia Classic and Rancilio Silvia, community workflows and videos abound that demonstrate reliable surfing rhythms; many owners later add aftermarket PID kits to simplify.
Real-World Flavor Targeting: A Mini Playbook
Goal: More sweetness → try +1°F, keep yield constant. If sweetness improves but finish gets bitter, reduce shot time by 2–3 s (slightly coarser) at the same temp.
Goal: Less harsh bitterness → try −1 to −2°F. If crema thins and acidity pops too much, bring the temp back +1°F and extend shot time by 2 s (slightly finer).
Goal: Open up a dense light roast → move to 203–205°F, maintain a well-distributed puck, and consider a slightly longer ratio (e.g., 1:2.2).
FAQ: Clear Answers for Common Questions
What does a PID controller actually do in my espresso machine?
It runs a control algorithm that continuously compares actual boiler temperature to your setpoint and adjusts power to minimize error. Practically, that means fewer swings and far more consistent brew water temperature at the puck.
Is PID worth it for beginners?
Yes. It removes the need for surfing routines and makes your results more repeatable, so you can learn faster and waste fewer beans.
What’s the best espresso brew temperature?
There isn’t a single “best” number; start within the 195–205°F (90–96°C) range and adjust by roast and taste. Stability and repeatability are more important than chasing one exact degree.
Do I still need to temperature surf with a PID?
No. The point of a PID is to maintain a stable brew temperature without timing a heat cycle. Surfing remains useful only for machines without PID.
Can I add a PID to a non-PID machine?
On many single-boiler classics (e.g., Gaggia Classic, Rancilio Silvia) the community has widely documented PID kits and DIY solutions. If you’re comfortable with basic electronics and accept warranty tradeoffs, it’s a proven upgrade.
Buying Guidance: Choosing a PID-Equipped Machine
If you want maximum control with effortless day-to-day use, a PID-equipped dual boiler or PID-governed HX is the sweet spot. Many modern machines include visible PID interfaces with simple up/down controls; some brands integrate PID while hiding the display. Enthusiast and retailer guides consistently highlight the stability and ease benefits.


